CloudEndpointsを使って手軽に安全にGKE上のAPIを公開する
導入
GKEにElasticsearchなどのクラスタを載せて運用するとき、 大抵はファイアウォールなどで特定のノードやネットワークからしかアクセスできないようにすると思う。 だがそれだけでは特定のAPIはアクセスを禁止し、特定のAPIだけ公開したいといったニーズには答えられない。 そこでCloudEndpointsを利用して秒速で安全なAPIを公開する方法を紹介する。
前提
- 構成はCloud CloudEndpoints + GKE(ESクラスタ)を想定
- 参照系はアクセスできるユーザ全員に、更新系はさらに特定の権限を持ったユーザにのみ公開するようにしたい
- 下記リンクのように、クラスタ内のclientノード(Pod)の前段にプロキシを配置し、プロキシがアクセスの制御を行う。 CloudEndpointsについて
ESクラスタの構築
最近stableに昇格したElasticsearchのhelmのチャートを使って構築する。
構築スクリプト
#!/bin/sh

cd $(dirname $0)

set -eux

CLUSTER_NAME=cloud-endpoints-sample-es

## Enable APIs
gcloud services enable deploymentmanager.googleapis.com

## Create GKE Cluster
gcloud --quiet deployment-manager deployments create \
  --automatic-rollback-on-error \
  --template ./deployment-manager/environment.jinja \
  cloud-endpoints-sample

gcloud container clusters get-credentials ${CLUSTER_NAME} --zone asia-northeast1-a

# Create Admin Cluster Role Binding To Current User
kubectl create clusterrolebinding cluster-admin-binding \
  --clusterrole=cluster-admin \
  --user=$(gcloud config get-value account 2>/dev/null)
kubectl create -f resource-helm-service-account.yaml

# Initialize helm
helm init --service-account helm --history-max 20
echo "wait for helm init task"
sleep 120

# Install ElasticSearch
helm install -f values.yaml --name ${CLUSTER_NAME} stable/elasticsearch
こんな感じにクラスタが出来上がる。
NAME                                                              READY     STATUS    RESTARTS   AGE
cloud-endpoints-sample-es-elasticsearch-es-client-67fbf5657ss5t   1/1       Running   0          32m
cloud-endpoints-sample-es-elasticsearch-es-client-67fbf565dnfhm   1/1       Running   0          32m
cloud-endpoints-sample-es-elasticsearch-es-data-0                 1/1       Running   0          32m
cloud-endpoints-sample-es-elasticsearch-es-data-1                 1/1       Running   0          29m
cloud-endpoints-sample-es-elasticsearch-es-master-0               1/1       Running   0          32m
cloud-endpoints-sample-es-elasticsearch-es-master-1               1/1       Running   0          30m
cloud-endpoints-sample-es-elasticsearch-es-master-2               1/1       Running   0          29m
インデックス定義
このように簡単な記事データを持つインデックスを想定する。
{
  "settings": {
    "index": {
      "number_of_shards": 5,
      "number_of_replicas": 1
    },
    "analysis": {
      "analyzer": {
        "ngram_analyzer": {
          "tokenizer": "ngram_tokenizer"
        }
      },
      "tokenizer": {
        "ngram_tokenizer": {
          "type": "ngram",
          "min_gram": 2,
          "max_gram": 2
        }
      }
    }
  },
  "mappings": {
    "_doc": {
      "dynamic": false,
      "properties": {
        "post_id": {
          "type": "keyword"
        },
        "title": {
          "type": "text",
          "analyzer": "ngram_analyzer"
        },
        "content": {
          "type": "text",
          "analyzer": "ngram_analyzer"
        }
      }
    }
  }
}
本当はインデックスを作るJobリソースをデプロイするとかしたほうが良いだろうが、今回は雑にpodに入ってcurlしてインデックスを作成。
kubectl exec -it  cloud-endpoints-sample-es-elasticsearch-es-client-67fbf565dnfhm bash

[root@cloud-endpoints-sample-es-elasticsearch-es-client-67fbf565dnfhm elasticsearch]# curl -X PUT "localhost:9200/posts" -H 'Content-Type: application/json' -d'
{
  "settings": {
    "index": {
      "number_of_shards": 5,
      "number_of_replicas": 1
    },
    "analysis": {
      "analyzer": {
        "ngram_analyzer": {
          "tokenizer": "ngram_tokenizer"
        }
      },
      "tokenizer": {
        "ngram_tokenizer": {
          "type": "ngram",
          "min_gram": 2,
          "max_gram": 2
        }
      }
    }
  },
  "mappings": {
    "_doc": {
      "dynamic": false,
      "properties": {
        "post_id": {
          "type": "keyword"
        },
        "title": {
          "type": "text",
          "analyzer": "ngram_analyzer"
        },
        "content": {
          "type": "text",
          "analyzer": "ngram_analyzer"
        }
      }
    }
  }
}
'
Cloud CloudEndpointsのデプロイ
エンドポイント定義ファイルをデプロイする
CloudEndpointsはswaggerの定義ファイルをデプロイすることで定義したAPIへのアクセスを許容することができる。 逆に定義していないエンドポイントについてはアクセスすることができない。 まずは雑に下記のような設定でデプロイする。
swagger: "2.0"
info:
  title: "Auth Proxy"
  description: "Auth Proxy For Elasticsearch Cluster"
  version: "1.0.0"
host: "cloud-endpoints-sample-es.endpoints.[PROJECT_ID].cloud.goog"
x-google-endpoints:
  - name: "cloud-endpoints-sample-es.endpoints.[PROJECT_ID].cloud.goog"
    target: ""
consumes:
  - "application/json"
produces:
  - "application/json"
schemes:
  - "http"

paths:
  /_cluster/health:
    get:
      description: "Returns the es clusters' health."
      operationId: "get_cluster_health"
      produces:
        - "application/json"
      responses:
        200:
          description: get cluster's health.
この設定だと、クラスタのヘルスチェックAPIのみ許容しリクエストを通すことになる。
gcloud --quiet endpoints services deploy -f cloud-endpoints.yaml
次にプロキシのServiceをGKE内にデプロイし、プロキシとCloudEndpointsの設定を紐づける。 これによって、実際にプロキシがきめられたルールに沿ってアクセス制御を行うことができる。 下記設定のうち、backendがGKEクラスタ内のclientノードを指し、serviceがendpointsのサービス名を指している。
apiVersion: v1
kind: Service
metadata:
  name: esp-cloud-endpoints-sample-es
spec:
  ports:
  - port: 9200
    targetPort: 9201
    protocol: TCP
    name: http
  selector:
    app: esp-cloud-endpoints-sample-es
  type: LoadBalancer
---
apiVersion: extensions/v1beta1
kind: Deployment
metadata:
  name: esp-cloud-endpoints-sample-es
spec:
  replicas: 2
  template:
    metadata:
      labels:
        app: esp-cloud-endpoints-sample-es
    spec:
      containers:
      # [START esp]
      - name: esp
        image: gcr.io/endpoints-release/endpoints-runtime:1
        args: [
          "--http_port=9201",
          "--backend=cloud-endpoints-sample-es-elasticsearch-es-client.default.svc.cluster.local:9200",
          "--service=cloud-endpoints-sample-es.endpoints.[PROJECT_ID].cloud.goog",
          "--rollout_strategy=managed",
        ]
      # [END esp]
        ports:
          - containerPort: 9201
kubectl apply -f resource-esp.yaml
esp-* があらたにデプロイされたプロキシのサービスのPodになる
NAME                                                              READY     STATUS    RESTARTS   AGE
...
esp-cloud-endpoints-sample-es-64f86b6df8-9xwpr                    1/1       Running   0          24s
esp-cloud-endpoints-sample-es-64f86b6df8-jlvjl                    1/1       Running   0          24s
ドメインネームをつける
CloudEndpointsはIPと[クラスタ名].endpoints.[PROJECT_ID].cloud.googドメインを紐付けしてルーティングする、DNS機能を提供している。 先程デプロイしたプロキシのExternalIPを、CloudEndpoints定義ファイルの下記の場所に記載し再デプロイすることでドメインでのアクセスが可能になる。
swagger: "2.0"
info:
  title: "Auth Proxy For Elasticsearch Cluster"
  description: "Auth Proxy For Elasticsearch Cluster."
  version: "1.0.0"
host: "cloud-endpoints-sample-es.endpoints.[PROJECT_ID].cloud.goog"
x-google-endpoints:
  - name: "cloud-endpoints-sample-es.endpoints.[PROJECT_ID].cloud.goog"
    target: "ここにIPを記載"
これによって下記のようにとりあえず外部からのアクセスができるようになる。
くコ:彡 curl "cloud-endpoints-sample-es.endpoints.cloud-endpoints-sample-225706.cloud.goog:9200/_cluster/health?pretty"
{
  "cluster_name" : "cloud-endpoints-sample-es",
  "status" : "green",
  "timed_out" : false,
  "number_of_nodes" : 7,
  "number_of_data_nodes" : 2,
  "active_primary_shards" : 5,
  "active_shards" : 10,
  "relocating_shards" : 0,
  "initializing_shards" : 0,
  "unassigned_shards" : 0,
  "delayed_unassigned_shards" : 0,
  "number_of_pending_tasks" : 0,
  "number_of_in_flight_fetch" : 0,
  "task_max_waiting_in_queue_millis" : 0,
  "active_shards_percent_as_number" : 100.0
}
また、CloudEndpointsの定義ファイルに指定していないエンドポイントを叩くとこうなる。
くコ:彡 curl "cloud-endpoints-sample-es.endpoints.cloud-endpoints-sample-225706.cloud.goog:9200/_cat/indices?v"
{
 "code": 5,
 "message": "Method does not exist.",
 "details": [
  {
   "@type": "type.googleapis.com/google.rpc.DebugInfo",
   "stackEntries": [],
   "detail": "service_control"
  }
 ]
}
これによって意図していないAPIへのアクセスを防ぐことができる。
JWT認証による制御
エンドポイントによって認証をつけたいケースがあったとする。 ここではJWT認証を想定し、特定のサービスアカウントによって署名されたJWTつきのリクエストのみ許可したいといったケースを想定すると、 下記のようにCloudEndpointsのswaggerファイルに記載しデプロイすることになる。
...

paths:
  /_cluster/health:
    get:
      description: "Returns the es clusters' health."
      operationId: "get_cluster_health"
      produces:
        - "application/json"
      responses:
        200:
          description: Get
      security:
        - google_jwt: []

securityDefinitions:
  google_jwt:
    authorizationUrl: ""
    flow: "implicit"
    type: "oauth2"
    x-google-issuer: "[PROJECT_ID].appspot.com"
    x-google-jwks_uri: "https://www.googleapis.com/service_accounts/v1/jwk/cloud-endpoints-sample-225706@appspot.gserviceaccount.com"
    x-google-audiences: "[PROJECT_ID].appspot.com"
この例だとGAEのデフォルトサービスアカウントによって署名されたJWT付きのリクエストのみ通すようになる。 リクエストするとこのように弾かれる。
くコ:彡 curl "cloud-endpoints-sample-es.endpoints.cloud-endpoints-sample-225706.cloud.goog:9200/_cluster/health?pretty"
{
 "code": 16,
 "message": "JWT validation failed: Missing or invalid credentials",
 "details": [
  {
   "@type": "type.googleapis.com/google.rpc.DebugInfo",
   "stackEntries": [],
   "detail": "auth"
  }
 ]
}
認証のオーバーヘッドも試しにStackdriverのトレースで見てみると、
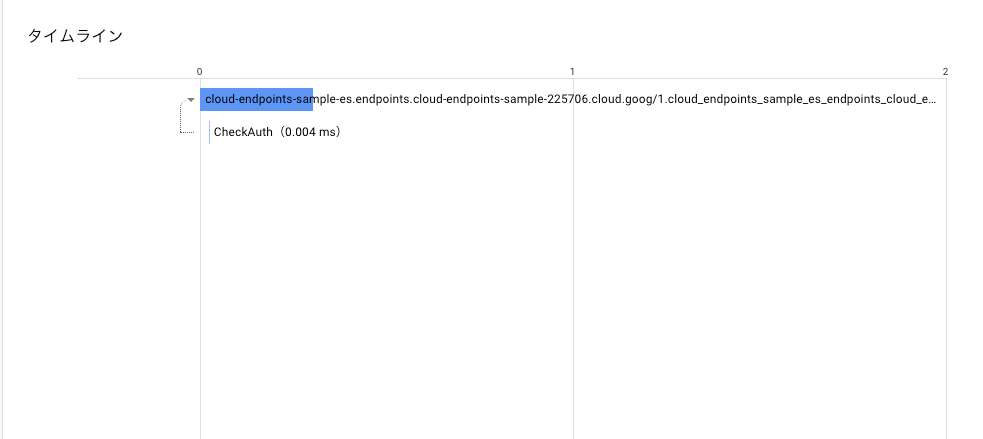
0.004ms(東京リージョン)程度だったので十分実用範囲内だと思う。
APIKeyによる制御
JWTではなく特定のAPIKeyによって制御したい場合は下記のようになる。
securityDefinitions:
  api_key:
    type: "apiKey"
    name: "key"
    in: "query"
この場合はGCPプロジェクトで発行したAPIのキーが付与されていることをチェックする(適当な文字列では通らない)
まとめ
GKEと併用してCloudEndpointsを活用することで簡単にAPIへのアクセス制御を実現できた。(実際の運用時にはファイアウォールも併用すると思うけど) これによって、限られたクライアントのみインデックスのドキュメント削除やインデックスの作成などができるといった制御が可能になる。 Elasticsearchだけでなく普通のAPIでも簡単に認証を入れられるはずなので活用していきたい。